Signify Guides
Signify Email Signatures: Create, Customize, and Add to Gmail or Outlook
Create a professional email signature in Signify, connect it to one of your digital business cards, customize its appearance, and copy it directly into Gmail or Outlook. This guide covers the complete workflow from creating a signature to managing multiple saved signatures.
One place for your professional signature: Signify lets you create branded email signatures using your contact details, linked card information, profile images, logos, social links, and selectable layouts.
Part 1: Creating and Editing Your Signify Email Signature
1. Start a New Signature
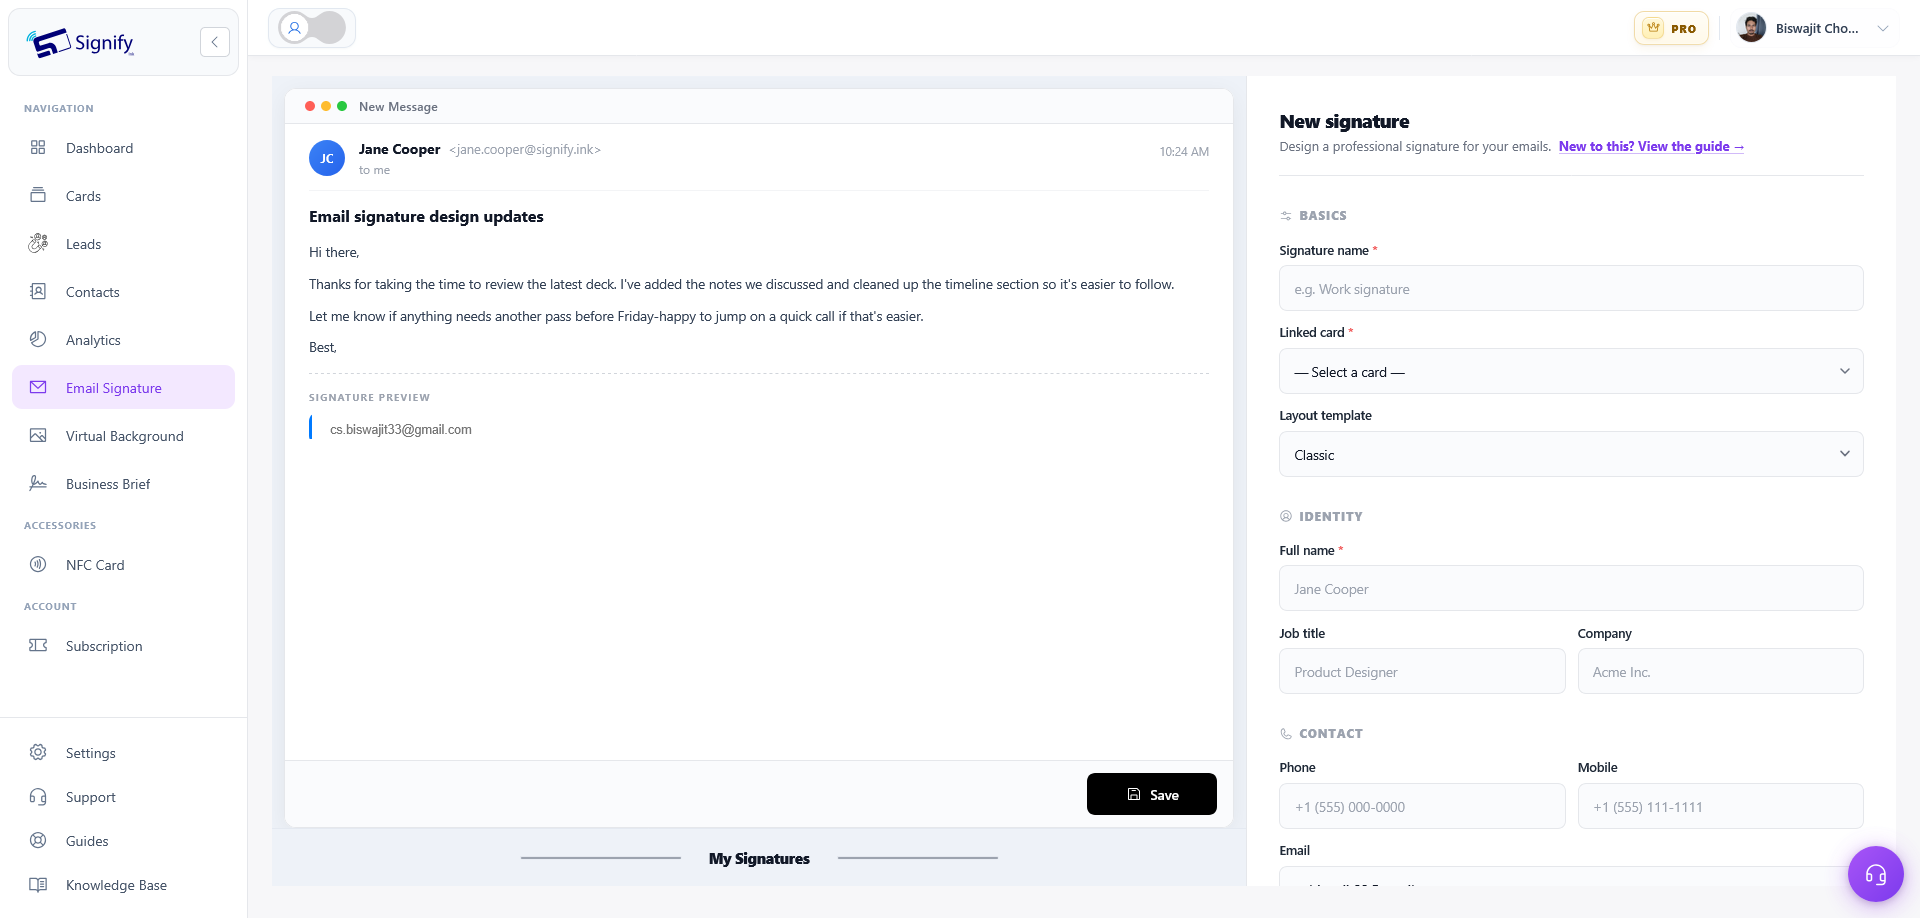
Open Email Signature in Signify and select New Signature. Enter a name so you can easily identify the signature later, then link it to one of your Signify digital business cards.
Next, choose the layout that best fits your communication style or brand.
- Classic: a clean, traditional layout with contact information beside a profile photo.
- Modern: a contemporary design with bold typography.
- Polygon: a stylized layout with geometric accents.
- Three Column: contact information arranged across three columns.
- Banner: a wide, banner-focused layout suited to promotional or brand-focused signatures.
2. Add Your Professional Details
Add the information you want people to see in your email signature. Your name is required, while the other fields can be used according to your needs.
- Job title
- Company
- Phone
- Mobile
- Website
- Address
You can also bring social media links from your linked Signify card into the email signature.
3. Customize the Signature Design
Adjust the visual style to match your personal identity or business branding. You can choose a theme color, font family, and font size.
Depending on the layout, you may also be able to include your Signify card's profile photo, a company logo, or a banner image.
The live preview updates as you make changes, allowing you to see how the finished signature will appear before saving it.
4. Save Your Signature and Set Its Status
Select Save to create a new signature. When changing an existing signature, select Update to apply your changes.
Only one signature can be active at a time. When you set a new signature as active, the previously active signature is deactivated.
5. Manage Your Saved Signatures
Open My Signatures to view your saved email signatures. From there, each signature can be managed individually.
- Copy as image: copy the rendered signature so it can be pasted into your email client.
- Edit: change the signature's details, layout, or styling.
- Delete: permanently remove the signature after confirming the deletion.
Part 2: Adding Your Signify Signature to an Email Client
After creating your signature in Signify, use Copy as image and paste the rendered signature into your preferred email client.
How to Add a Signify Signature to Gmail
Add or Change a Gmail Signature
- Open Gmail.
- At the top right, select Settings, then See all settings.
- In the Signature section, paste your copied Signify signature into the signature text box. You can make additional formatting changes, such as adding an image or adjusting text styles.
- Scroll to the bottom and select Save Changes.
Gmail limit: Gmail signatures can contain up to 10,000 characters. Images also count toward this limit, so reducing the image size may help if you encounter a limit-related error.
Edit a Gmail Signature
- Open Gmail.
- At the top right, select Settings, then See all settings.
- Under General, scroll to Signature.
- Select the signature you want to edit.
- Make your changes in the editor. To rename the signature, select the Edit icon next to its name.
- Scroll to the bottom and select Save Changes.
Remove a Gmail Signature
- Open Gmail.
- Go to Settings > See all settings.
- Under General, scroll to Signature.
- Select the signature you want to remove.
- Select Delete and confirm.
- Select Save Changes.
Use Different Signatures with Gmail's "Send mail as"
When you send messages from multiple addresses using Gmail's Send mail as feature, you can assign a different signature to each address.
In the Gmail Signature settings, use the drop-down menu above the signature text box to choose the address whose signature you want to configure.
If the address selector is not visible, open Accounts and Import settings and check that the additional addresses are listed in the Send mail as section.
Gmail also lets you configure a default signature separately for new emails and for replies and forwards.
How to Add a Signify Signature to Outlook
The following steps apply to the newer Outlook experience.
Create and Add an Outlook Signature
- Select Settings using the gear icon in the top-right corner.
- Go to Accounts > Signatures.
- If you have multiple accounts, select the account where you want to use the signature.
- Select Add signature and give the signature a distinct name.
- Paste your copied Signify signature into the editing box.
- Apply any additional formatting you want, such as font, color, or style.
- Use the checkboxes at the bottom to automatically apply the signature to new messages and/or replies and forwards.
- Select Save.
Add a Signature While Writing an Email
- From Mail, select New mail.
- In the Insert group on the Message tab, select Signature.
- Choose the saved signature you want to insert from the drop-down list.
Edit an Existing Outlook Signature
- Open Settings using the gear icon.
- Go to Accounts > Signatures.
- Select the Edit icon next to the signature you want to change.
- Make your changes.
- Select Save.
Tips for Using Signify Email Signatures
- Match your signature to your role: use a professional layout for everyday business communication and a more promotional style when appropriate.
- Keep contact information current: update your Signify signature whenever important professional details change.
- Choose the right layout: Classic and Modern can work well for everyday communication, while Banner can be useful when visual promotion is important.
- Use the live preview: check spacing, typography, images, and contact details before copying the final signature.
- Keep only the signature you need active: Signify allows one active signature at a time, while other saved signatures remain available in My Signatures.
Signify Email Signature FAQ
How do I create an email signature in Signify?
Open Email Signature, select New Signature, give it a name, link it to one of your Signify cards, choose a layout, add your professional details, customize the design, and save it.
Which email signature layouts are available?
Signify provides Classic, Modern, Polygon, Three Column, and Banner layouts.
Can I add my Signify card information to an email signature?
Yes. You can link a Signify card and use its information, including available social media links. Depending on the selected layout, you may also include a profile image, company logo, or banner image.
Can I have multiple email signatures in Signify?
Yes. You can save multiple signatures in My Signatures. However, only one signature can be active at a time.
How do I put my Signify signature into Gmail?
Use Copy as image in Signify, then open Gmail Settings, go to the Signature section, paste the rendered signature, and save your Gmail settings.
How do I put my Signify signature into Outlook?
In New Outlook, go to Settings, then Accounts > Signatures, create a signature, paste the copied Signify signature, and save it. You can also choose whether Outlook automatically inserts it into new emails and replies.
Can I edit an existing Signify email signature?
Yes. Open My Signatures, choose Edit, make your changes, and select Update to apply them.
Can I delete a Signify email signature?
Yes. Open My Signatures, choose Delete on the signature you want to remove, and confirm the deletion.
Put Your Professional Identity in Every Email
A Signify email signature brings your professional contact information and branding into your everyday email communication. Create a reusable signature, customize it to match your style, and add it to Gmail or Outlook in just a few steps.
Keep your email signature consistent with your Signify digital business card and make it easier for people to connect with you.